
Hi, if you don’t know me, I’m Dr Theresa Orr.
You’re welcome to learn more about how I help students succeed at university with my Uni Pro Accelerator Course.
I’m going to show you how I use Google Scholar to speed up my research. These steps will save you hours of searching and make your assignments easier to write. If you’re not familiar with Google Scholar it’s exactly the same as regular Google except the results are peer-reviewed journal articles, rather than Wikipedia or blog articles. And Yes, Google Scholar is useful for both undergrad and postgrad students.
Google Scholar can speed up research by showing you relevant peer-reviewed journal articles (including their PDFs) for every search. The algorithm is better than any other search tool, including university library sites. Google Scholar also has an inbuilt library that you can add to, and it makes citing and referencing faster as well.
You can use Google Scholar without signing in, but it’s better if you login because that way you have full
access to all of its features. If you prefer to watch (instead of read) here’s my video on how to use Google Scholar:
Step 1: Understanding Your Search Results
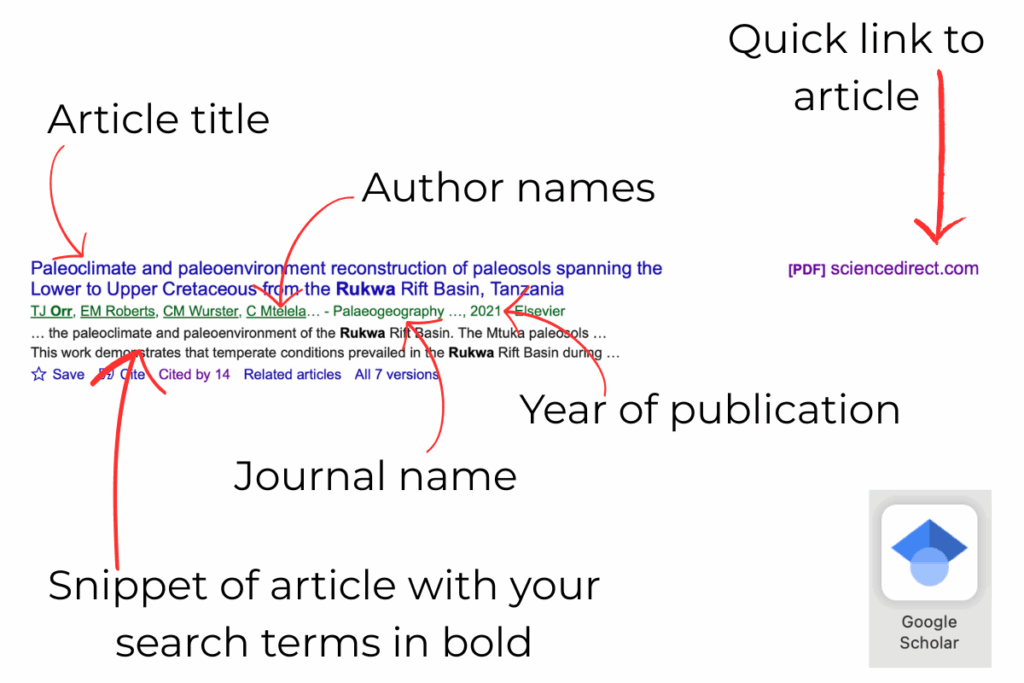
When you type a topic or search term into Google Scholar, your search results look a little different from regular Google. Here’s what you’ll see (check the image below for reference):
- Article Title: This is the blue link at the top. Clicking it usually takes you to the journal’s website where the article is published.
- Author Names: Right under the title you’ll see who wrote the article.
- Journal Name and Year of Publication: This tells you where and when the article was published.
- Snippet with Keywords in Bold: Just like Google search, Scholar shows a preview of the text with your search terms highlighted.
- Quick Link to PDF (if available): On the far right, look for a link that says [PDF]. Clicking it opens the article directly, often for free.
I’ll explain the bottom line of the search result a bit further on, as this is where the research magic happens.
Step 2: Quick Access to PDFs
This is one of the biggest time-savers in Google Scholar. Instead of digging through your university’s library login and publisher websites, you can:
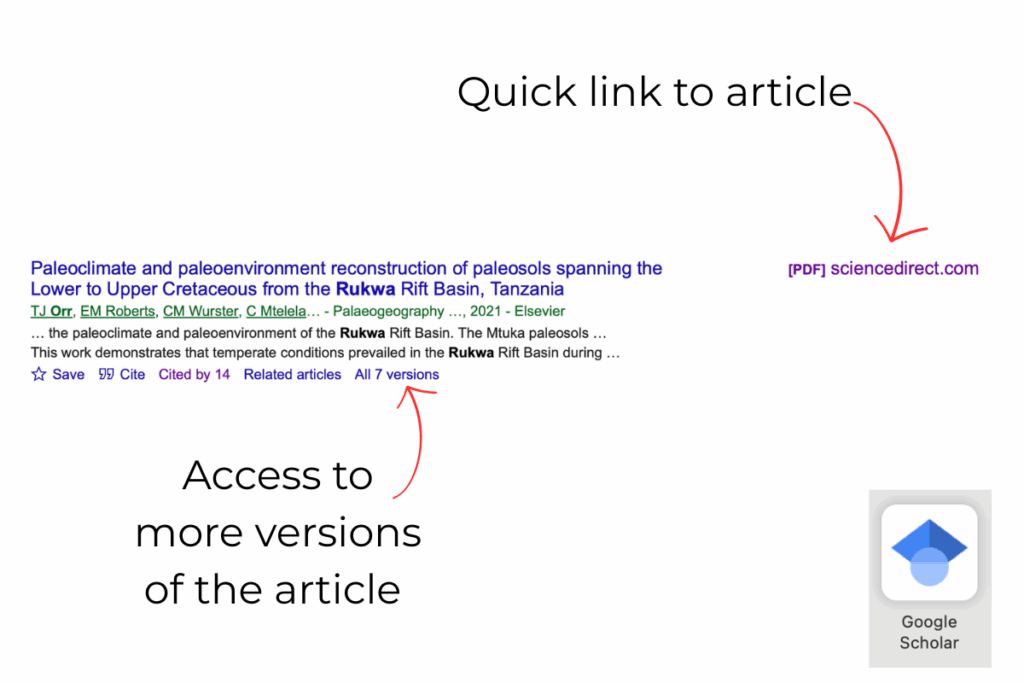
- Click the [PDF] link on the right to instantly open a version of the article. Sometimes this is one the author has uploaded, but often it’s the officially published version.
- If that PDF doesn’t work or isn’t complete, click “All versions” underneath the result. Any version that has [PDF] beside it can also be opened. Sometimes you’ll find the official journal PDF this way, with figures, tables, and a DOI included.
By using these shortcuts, you skip multiple logins and page redirects, going straight to the research you need.
Step 3: Citing Made Simple
Another feature that makes Google Scholar so powerful (and helpful) is the Cite button. This saves you a huge amount of time when writing references for your assignments.
Here’s how to use it:
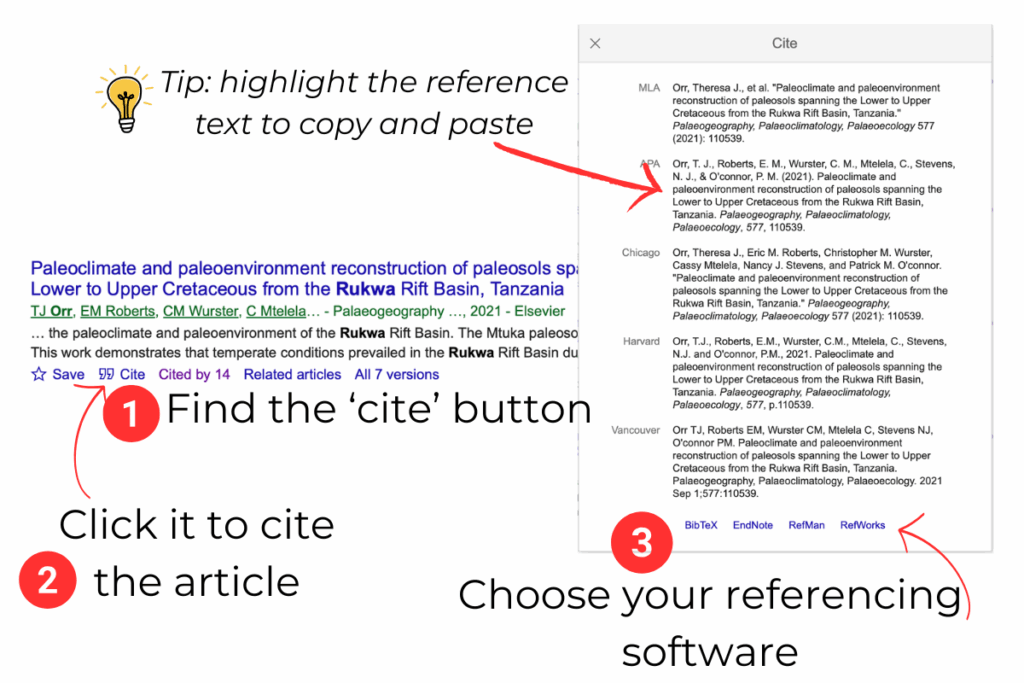
- Find the Cite button – Under every search result, you’ll see a small quotation mark icon (
") that says Cite. - Click it – A pop-up will appear showing you the article citation in several common styles, including APA, Harvard, MLA, Chicago, and Vancouver.
- Choose your method:
- If you use referencing software (like EndNote) – Select your program from the bottom of the pop-up and Scholar will export the reference straight into it.
- If you don’t use software – Just copy the citation in the style you need and paste it directly into your Word document.
Important note: Always double-check the details against the actual article. Scholar sometimes misses information (like page numbers or DOIs) or formats things slightly wrong. But even with that, it’s still far quicker than downloading a citation from most library cites, or manually typing one out.
Step 4: Narrowing Down Your Search
When you first type a topic into Google Scholar, you’ll often get hundreds (or even thousands) of results. But not all of them will be relevant, especially if they’re old studies. The good news is you can easily filter your results to make sure you’re only looking at the research you actually need.
Here’s how to do it:
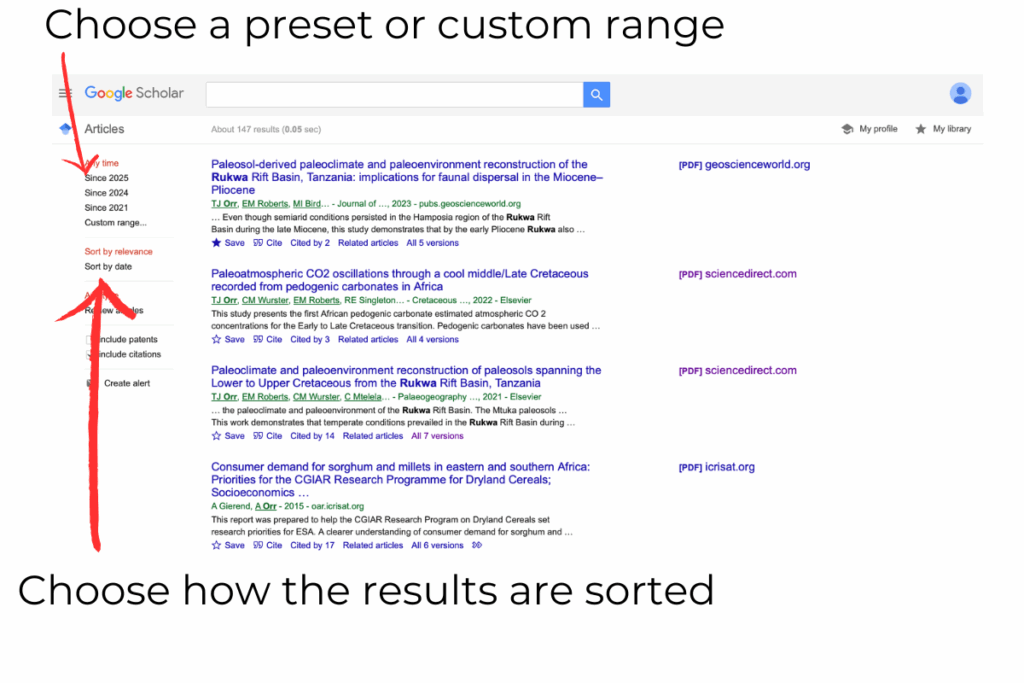
- Look to the left-hand side of the page: You’ll see filter options under the heading Any time.
- Choose a preset range: For example, “Since 2019” will show only the most recent studies from the last few years.
- Set a custom range: If you want to be more specific, you can type in your own dates (e.g., 2000–2023) to include just the time period that matters to your project.
- Sort results: At the top of the page, you can choose Sort by relevance (usually best) or Sort by date (handy if you only want the very latest research).
Filtering this way means you’ll quickly cut out outdated material and focus on the most up-to-date, relevant research for your assignments or literature reviews.
Step 5: Finding Related Articles and Authors

Once you’ve found a paper that’s exactly what you need, the next step is finding more related or similar articles articles quickly. Google Scholar makes this really easy. In fact, this is one of the best features of Google Scholar when it comes to speeding up research, and there’s two ways to do it.
Option 1: Use the “Related Articles” Button
- Click “Related articles”: It’s under the article you’re interested in (see image below).
- Select a new article: A list of similar papers connected to the one you selected will now appear. Select the ones that you want.
- Repeat the process. If you find another useful article in that list, hit Related articles again to uncover even more.
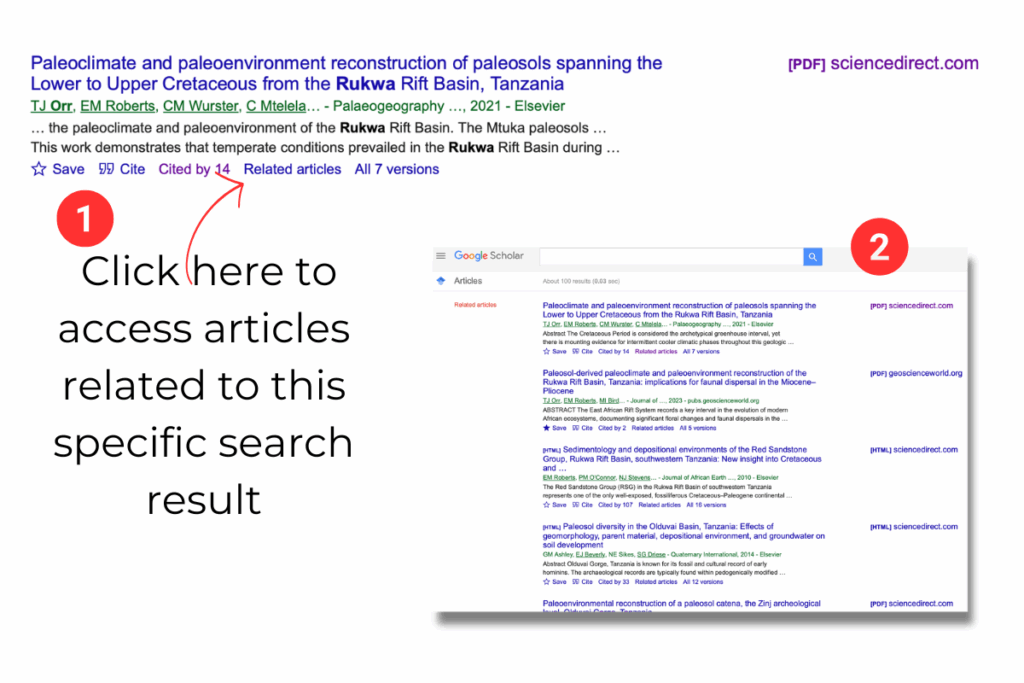
This is one of the fastest ways to build a reading list for a literature review, because instead of starting fresh every time, you’re following chains of closely linked research.
Option 2: Explore Author Profiles
- Click on an author’s name (highlighted in blue under the article title).
- You’ll see their Google Scholar profile, which usually includes:
- A full list of their publications
- How many times each has been cited
- Options to sort by citation count (click on ‘CITED BY) or by most recent (click on ‘YEAR’)
- Filter within their profile – if they publish a lot, you can use your browser’s Find function (Ctrl+F or Command+F) to search for specific keywords in their titles.
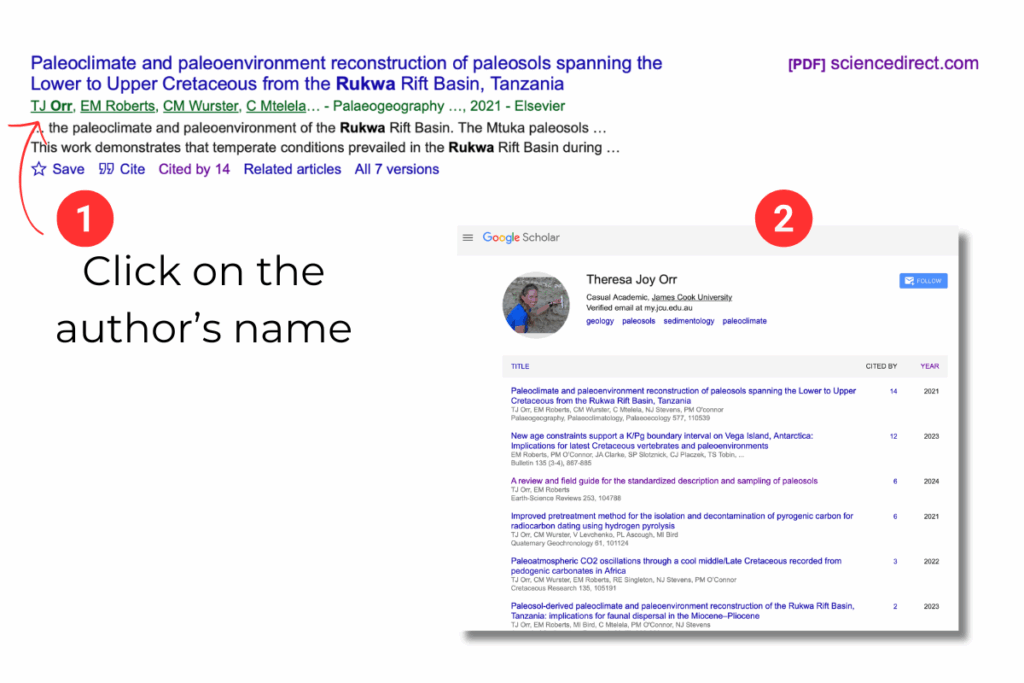
This is especially helpful if you know the author specialises in your area. Instead of sifting through unrelated results, you can quickly pull together a set of papers written by someone with deep expertise. Then you can also select one of the co-authors and jump straight to their research.
If you aren’t sure on which authors might be experts in the area you are researching you can ask ChatGPT for a list of some (it’s not perfect, but it can be a helpful start).
You can read more about how to best use AI at university (and not get into trouble) here.
Step 6: Saving and Organising Your Research
Finding articles is only half the job of course, so the real challenge is keeping them organised so you can easily access them and use them later. There’s nothing worse than not being able to find something you are sure you read. That’s where Google Scholar’s Save button comes in. You’ll need to login to Google Scholar to access this feature (but it’s worth it).
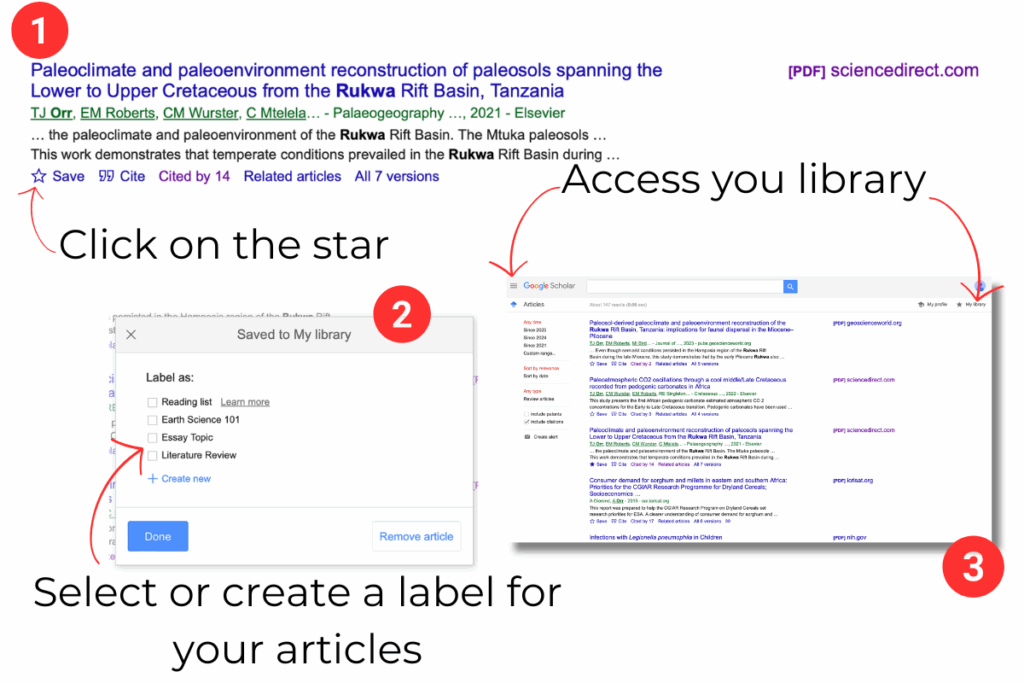
Here’s how to use Google Scholar’s library and save function:
- Click on the star icon: Under each result you’ll see a little ★ (Save button). This button adds the article straight into your personal Google Scholar Library.
- Add labels: Within your library, you can create labels to sort your research. For example:
- Literature Review
- Essay Topic
- Project X
- Access your library: Click the three horizontal lines (the “hamburger menu”) in the top-left corner, then select My library. You’ll see all your saved articles neatly stored.
- Clean up when you’re done: Finished with a project? Just delete the articles you don’t need anymore to keep your library clutter-free.
By saving and labelling as you go, you’ll avoid the chaos of random PDF downloads scattered across your computer, and you’ll have everything ready to cite when it’s time to write. I like that you
