
Hi, if you don’t know me, I’m Dr Theresa Orr.
You’re welcome to learn more about how I help students succeed at university with my Uni Pro Accelerator Course.
The way you organize your lecture or study notes can make the difference between stressing at exam time or actually having a system that makes studying easier. I’ve used the same organization method for my undergrad, my PhD, and now in my research as a lecturer, and I can tell you that messy, unstructured notes (or worse having no notes) always makes writing assessments and studying for exams harder.
There are two main ways that you can organize notes that work really well at university: organizing notes by time (weeks) or by theme (topics). Whichever one you choose, the key is to stay consistent over a whole semester.
Here’s how I recommend setting up your notes, plus a few tips I wish I’d known earlier…
You can also watch my video on how to organize your study notes here:
1. Organize By Time (Week-by-Week Notes)
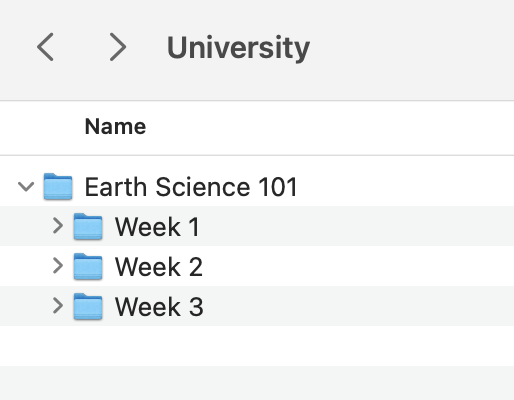
This is the easiest and most common way to structure your lecture notes. You start by dividing everything by week (e.g., Week 1, Week 2, Week 3) and then add your lecture notes, tutorials, and lab work (etc) to the folder for that week. I would also create a main folder for each subject (e.g., Earth Science 101), and then save the ‘week’ folders to each one. You can do this using Word and then just have the folders on your desktop or preferred cloud location (I like OneDrive) or OneNote is also great because you can have your folders in the application itself.
The time organization method works because it:
- Has a clear sequence: Your notes follow the order of your course so it’s easy to remember when you learned a topic. If your lecturer designs assessments (e.g., practicals) based on the weekly content, this also makes it easy to find what you need.
- Makes it easy to match: Handouts, practical notes, and tutorial exercises usually connect to the same week’s lecture, so you can keep them together.
- Requires minimal setup: You don’t need to think about categories or reshuffling, just add notes into the right week as you go. Start a new week…start a new folder.
Example
Create a subfolder or document for Week 3 in a folder for “Earth Science 101”. Include everything from week 3 in the document, or as individual documents in the folder for that week:
- Lecture notes: Plate tectonics basics
- Tutorial notes: Case study on earthquakes
- Lab notes: Rock samples linked to tectonic activity
- Reading notes: Chapter 4 of the textbook
Organizing lecture notes by time is best for courses with a clear weekly progression, like law, business, or health sciences, where assessments and tutorials closely align with lectures. It’s not so helpful if you cover multiple topics in a single week, or if one topic extends over multiple weeks.
💡Tip
Create a digital folder for each week (e.g., “Week 3”) and save your:
- lecture slides
- readings
- own notes
That way, when you’re revising or looking for content for your assignments, you won’t waste time searching for files.
2. Organize By Theme (Topic-Based Notes)
Instead of organizing your notes under Week 1, Week 2, and so on, you sort everything by topic. For example, in an Earth Science course, you can create folders or sections for Earthquakes, Volcanoes, and Plate Tectonics.
I find this works better because:
- Deeper understanding:
Grouping information by topic helps you make connections between different pieces of information regardless of what week you learnt it or from where you found it (e.g., readings, practical or lecture). It’s these connections or complete understanding of a topic that exams are really testing (rather than just being able to repeat information you memorized) - Perfect for exams:
When you’re revising, you can go straight to “Earthquakes” and see all your notes, readings, and case studies in one place. No flicking through Week 1, Week 5, and Week 9 trying to understand everything together. - Perfect for assessments:
When you’re working on an essay, lit review or report (etc), it’s easier if you can command or ctrl F and search through your documents to find the information you need on your specific topic when it’s all saved in one place. - Flexibility with readings:
Required readings don’t always match the week’s lecture. Sometimes a Week 1 reading fits better with Week 3’s topic (or let’s face it, in reality we are often so far behind our readings that we never actually read them in the right week). Organizing by theme means you can put it where it belongs.
Example
Create a subfolder for Volcanoes in a folder for “Earth Science 101”. Include everything on that topic in the document, or as individual documents in the folder for the week:
- Lecture notes: Types of volcanic eruptions
- Tutorial notes: Case study on Mount St. Helens
- Reading notes: Article on volcanic gas emissions
- Lab notes: Rock samples linked to volcanic activity

Organizing your lecture or study notes by theme (or topic) is best for analytical or exam-heavy subjects (or courses) where the material overlaps across weeks (e.g., sciences, medicine, psychology, some humanities).
💡Tip
If you’re using digital notes (Word, OneNote, or Notion):
- create a master topic page with subpages for each theme
This way, you can keep adding to each topic throughout the semester, and it’s ready-made for exam revision.
3. Use Headings, Subheadings, and Bullet Points

Never use long pieces of text in your notes. If you write paragraphs, all you’ll end up with is unhelpful and unrevisable notes. When your notes look like a wall of text, chances are you’ll never go back to them (or worse, you’ll waste time trying to reread them instead of studying).
Instead, aim for structure by using:
- Hierarchy:
Use numbering or indentation (Heading 1, Heading 2, etc.) so you can see how ideas link together at a glance. - Headings:
Break each lecture into clear main topics. This makes it easier for both exams and assignments. - Subheadings:
Divide those topics into smaller chunks (e.g., “Causes of volcanoes” → “Mantle plumes,” “Plate tectonics”). - Bullet points:
Replace long sentences with short, sharp points. If you can do this it means you also understand the material of your lectures, and will mean you’ll do better in your exams.
Example
Example (bad vs good):
❌ Paragraph-style notes:
“Earthquakes are caused by the movement of tectonic plates. These plates shift and release energy, which can result in ground shaking. Human activity such as mining or dam building can also lead to earthquakes. The effects can be devastating, especially in densely populated areas.”
✅ Organized notes:
Causes of Earthquakes:
- Impacts: strongest in high-density areas
- Tectonic movement: plates shift, release energy → shaking
- Human-induced: mining, large dams, fracking
You can also have longer pieces of text that are organized as bullet points to make them more easily scannable when you need to find something, e.g.:
Using an organization structure works because when you’re writing an essay or cramming for an exam (obviously try to avoid that…), you’ll almost always search your notes for a keyword using Ctrl + F (or Command + F on Mac). Structured notes make that search useful and easy, the keyword shows up inside a clear heading or bullet point, not buried in a block of text that you then have to read.
💡Tip
Develop your own shorthand for repeated words or terms.
- For example, “EQ” for earthquake, “GHG” for greenhouse gas. Just make sure you’ll remember it later!
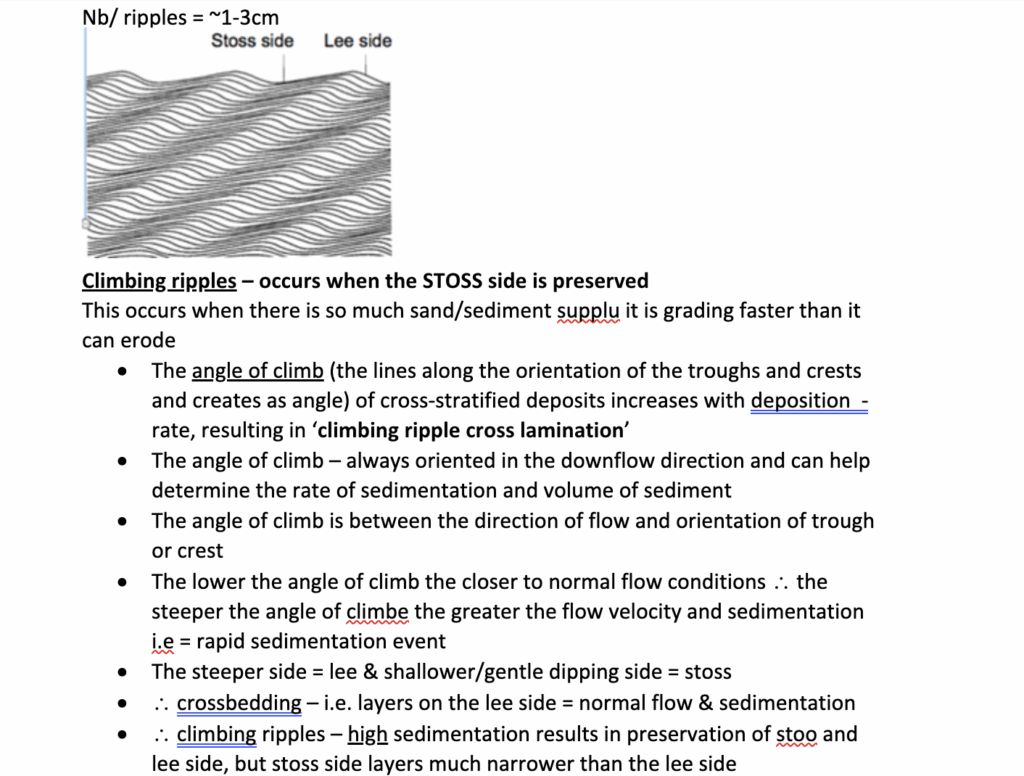
Add images to make the text make more sense to you. This can really help with understanding topics when it comes time for exams.
- Many images in lecture notes are actually used by lecturers in their exams, by using them for your notes, your study time will be extra effective.
4. Add Visual Structure (Color Coding)
Color coding isn’t just about making your notes look pretty (although it does). It actually helps your brain sort and store information. When you use consistent colors, you’re giving your memory an extra “cue” to grab onto later.
Here’s the simple system I use:
🟢 Green = Definitions
Anything that needs to be remembered word-for-word (e.g., “Osmosis = movement of water across a semipermeable membrane”).
🌸 Pink = Main Topic Ideas
These are the core concepts you need to deeply understand (e.g., “Photosynthesis process” or “Key themes in Shakespearean tragedy”).
🟠 Orange = Key Pieces of Information or important dates
The must-know facts that are almost guaranteed to show up in exams (e.g., “ATP is produced in the mitochondria”).
💛 Yellow = Real-World Links, or Background Info
Helpful for long-answer or essay-style questions where you need to connect theory to practice (e.g., “Solar energy adoption is rising in Australia due to government subsidies”).
Obviously you can use any colors you like for whatever you want, but the main thing is that you can instantly recognize the color for what meaning you have given it e.g., green for definitions. Highlighting or color coding works because instead of seeing a wall of black text, your brain instantly spots what type of information you’re looking at. That makes both revising and writing essays far easier.
💡Tip
Stick with your system all semester.
- If green means definitions in Week 1, don’t let it mean “case study” by Week 8
Consistency is what makes color coding powerful.
5. Always Back Up Your Notes
I’ve seen too many students lose weeks of work because a laptop died or a hard drive crashed. Don’t risk it. Nothing kills motivation faster than having to redo notes (let alone assignments) you already spent hours working on.
Here’s the system I recommend:
- Keep one copy on your computer: easy to access for day-to-day study.
- Save at least one more copy in the cloud: Google Drive, OneDrive, or Dropbox all work (choose whichever you already use). That way you can access them from any computer.
- Optional: keep a synced copy on your phone or tablet: helpful if you want to revise on the go or if you’re not near a computer.
- Optional: save in multiple formats: e.g., .doc and .pdf (this is a must if you are using any drawing software like illustrator too)
Think about it this way… if your laptop fell off your desk tomorrow, would your notes survive? If the answer’s no, then back them up today.
💡Tip
Automate it:
- Set your notes folder to auto-sync with a cloud service.
That way you never forget, and you’re protected even if disaster strikes mid-semester (it almost always does).
6. Stick With One Method for a Semester
Whether you organize your notes by time (Week 1, Week 2, Week 3…) or by topic (Volcanoes, Earthquakes, Plate Tectonics), the most important thing is consistency. Whatever you do, don’t change your system in the middle of a semester (or trimester).
Switching halfway through a semester leaves you with a messy system where half your notes are one way, and half are another… and trust me, at exam time, that’s a nightmare.
When you stick with one method, you’ll always know exactly where to look. It makes assignments and revision faster and less stressful because your notes are predictable (and helpful).
💡Tip
Start simple.
- Notes don’t need to be pretty.
The best notes are the ones you can actually use… to revise, plan essays, and to answer exam questions.
